Coolify - Self Hosting on Steroids
Introduction
In today’s fast-paced web development world, hosting platforms like Vercel have become indispensable for developers to deploy, manage, and scale their web applications. However, while Vercel, Heroku and Netlify offer an elegant solution with zero-config deployments and powerful serverless functions, it comes with certain limitations: pricing, lack of complete control over your infrastructure, and restrictions around customization. For developers and businesses seeking more flexibility, cost-efficiency, and control, Coolify is a not only a great and powerful alternative, it could well be all you need.
✨ Awesome Features
- Compatible with any programming language or framework
- Deploy to any server with SSH access
- Supports various use-cases (single server, multiple servers, Docker Swarm)
- Push-to-deploy with Git integration
- Automatic SSL certificate management
- No vendor lock-in
- Powerful API for automation and integration
Supported Platforms
Coolify can be installed on various platforms, including:
- Your own servers
- Remote VPS & Cloud providers (Digital Ocean, Hetzner, Vultr, etc.)
- a Raspberry Pi
- And more!
Step 1: Setting up Coolify
- Provision a server (if you don't already have one)
- Install Coolify by logging into your server and running the provided installation script:
curl -fsSL https://cdn.coollabs.io/coolify/install.sh | bash
- Follow the onboarding process in your browser
That's it! You can now start deploying your applications with Coolify 🚀
Coolify provides a clean and intuitive web interface for managing your applications, services, and deployments. You don't need to be a DevOps expert to use it effectively.
Step 2: Onboarding
Onboarding is a straightforward process:
- Access the Coolify Dashboard: After installation, open your browser and navigate to the provided url from the install script.
- Create Admin Account: You'll be prompted to create an admin account. Choose a strong password for security.
- Configure Coolify:
- Follow the instructions provided in the onboarding process.

- Follow the instructions provided in the onboarding process.
- First project: Once Coolify is set up, you can deploy your first project directly from the project page.
Step 3: Deploying a Nuxt project
Sources tab in the sidebar and then clicking on the Add button.- Create a new project by clicking on the
Projectstab in the sidebar and then clicking on theCreatebutton in the top left corner. - Click on 'Add New Resource' and continue with the instructions.
- Select your GitHub app from the list of available apps.
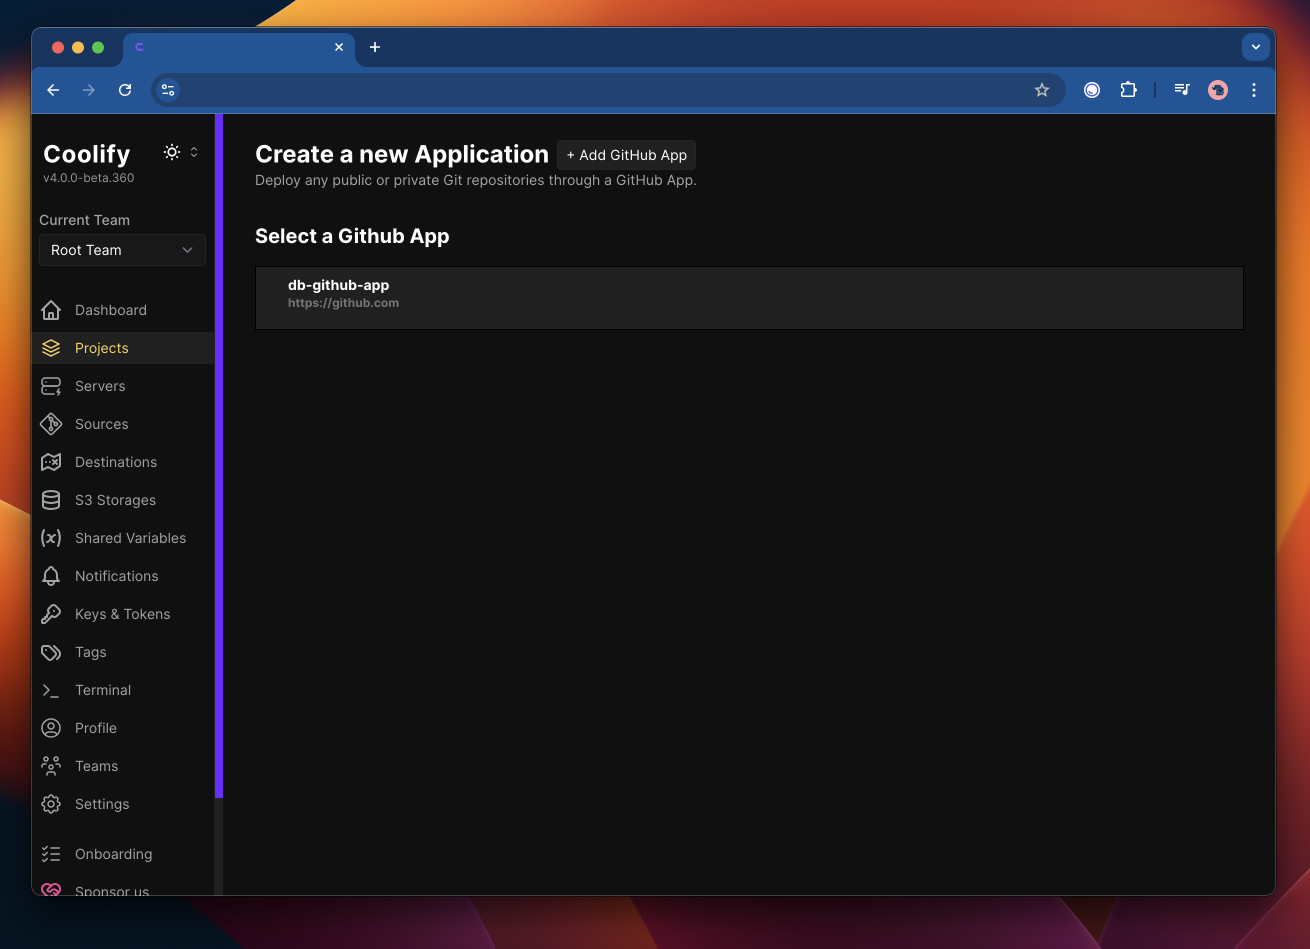
- Select
Nixpacksas the build pack. Set the port to3000, hit theContinuebutton.
- Now let's go over the General project settings.
If you don't have a
startscript in your project, you can use the start override field to start your app, includenode .output/server/index.mjsin theStart Commandinput field.
- Make sure that the
Port Exposesinput field is set to3000. - Ensure you have a
startscript in yourpackage.jsonfile or are using theStart Commandinput field to start your app once Nixpacks is done building your app. - Click on
Generate Domain, Coolify will generate a random domain for your project, don't forget to hit theSavebutton at the top.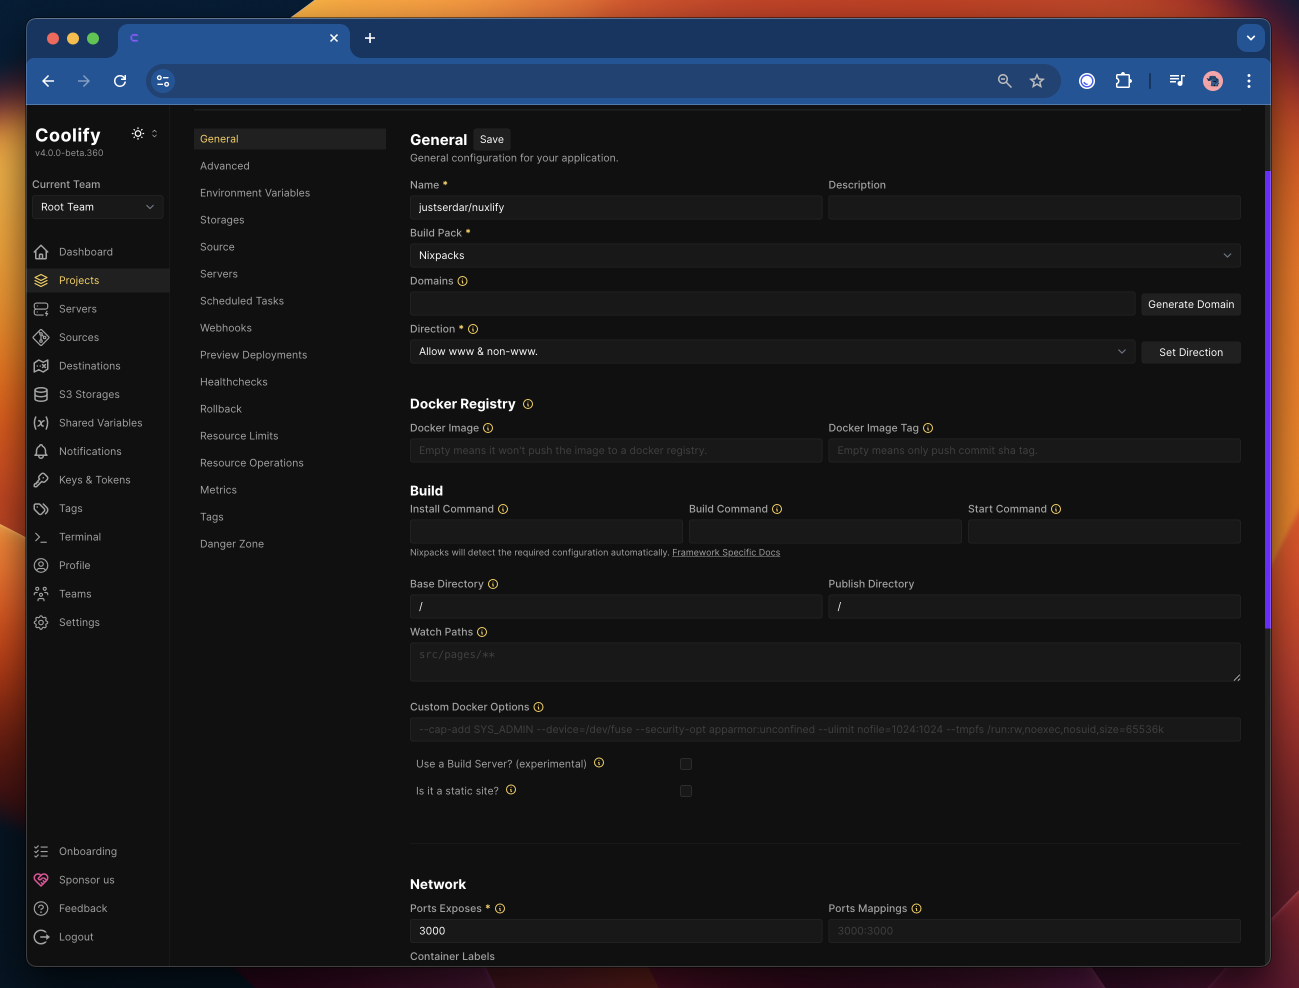
- Click on
Healthcheckin the project sidebar and set thePathto/and thePortto3000and hitSave. This will ensure that Coolify knows the container is healthy.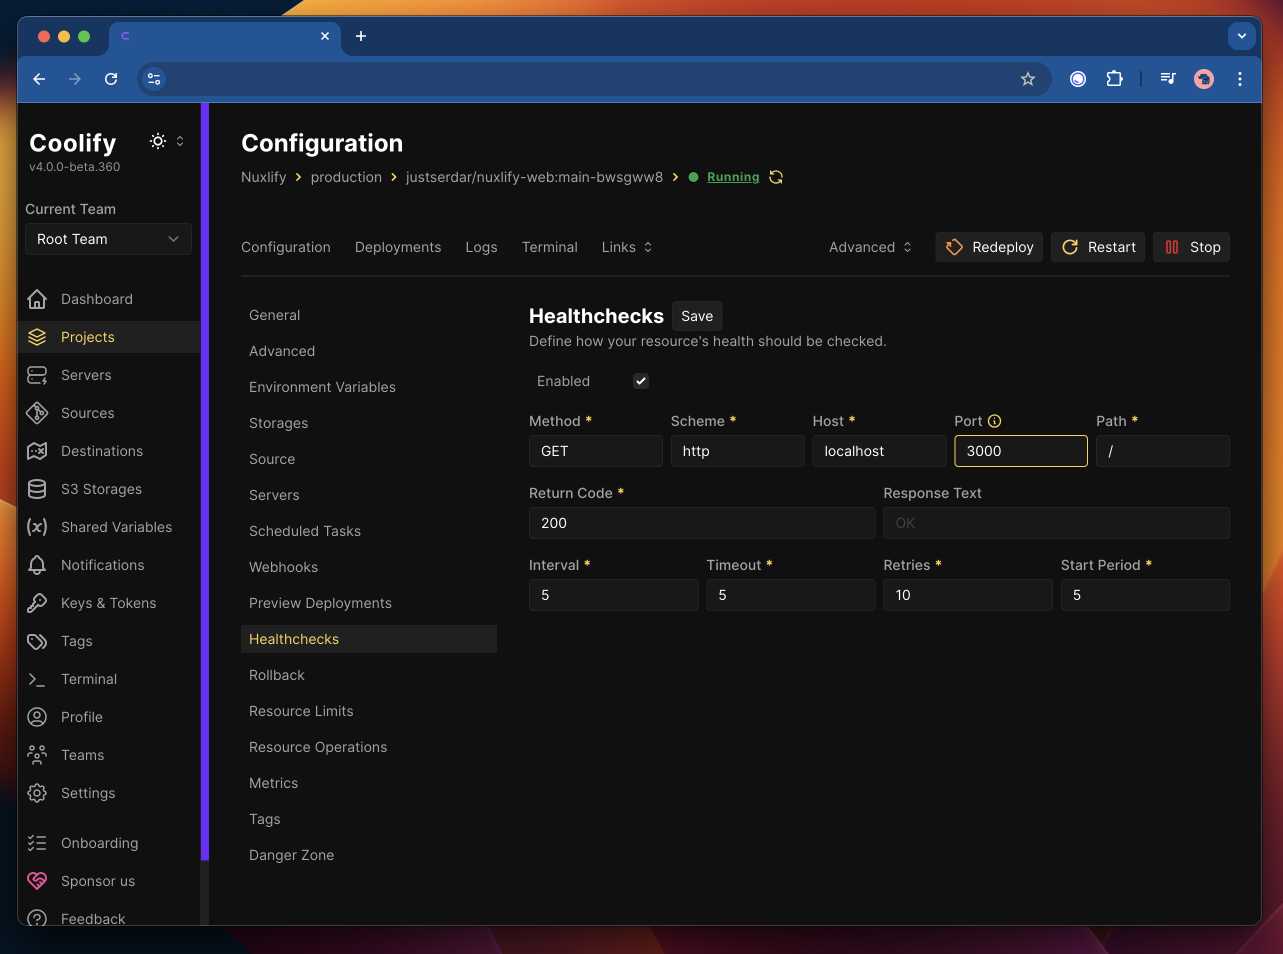
- Within the
environment variablestab, you can add your app specific environment variables:
- E.g:
NIXPACKS_NODE_VERSION:20.x, will override the default Node.js version to the latest version of Node v20. Check the Nixpacks documentation for more.
Step 4: Bonus Steps
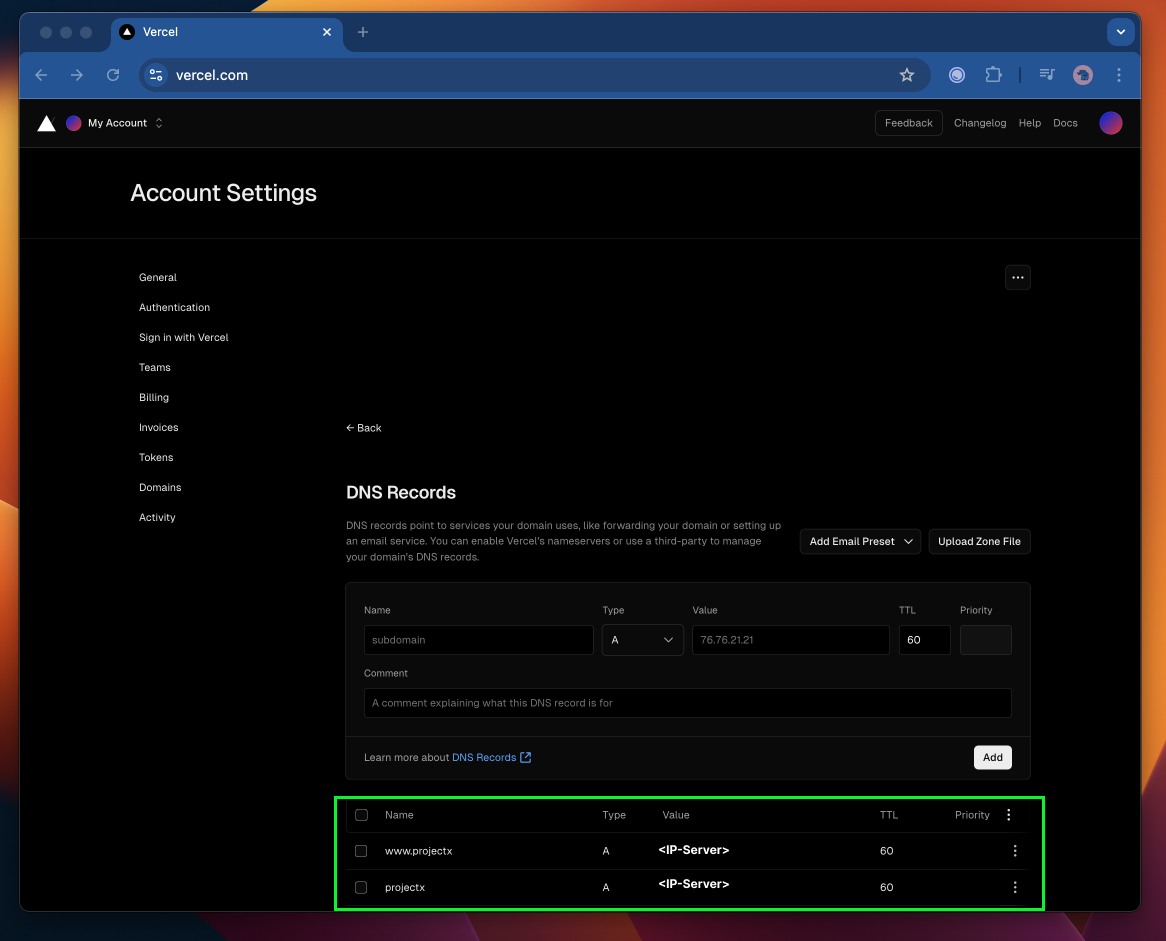
A records should point to your Coolify server's IP address. This can take a bit of time to propagate, 5min-48hours ish.
HTTPS Domain, Wildcard Domain & SSL Certificate
Enabling HTTPS for your Coolify Dashboard via a subdomain.
- Go to
Settingsin the sidebar. - Edit the
Instance's Domainto be a subdomain of your domain, f.e.coolify.yourdomain.com. If you'd like also change the Instance Name to something more memorable (will come in handy later). - Hit the
Savebutton.
Enabling HTTPS for your projects.
- Go to
Serversin the sidebar. - Find your localhost server.
- TIP: It's
IP Address/Domainvalue will behost.docker.internal.
- In the
Wildcard Domainfield, add your domain, f.e.https://yourdomain.com. - Hit the
Savebutton. - Now hit the
Restart Proxybutton in the top right corner, this will restart your Coolify proxy, don't refresh the page.
http://<ip-of-server>:8000. Go back to the Servers page, find your primary Cooliify instance and restart the Proxy. All should be good.If you now navigate to your project, you should see that when you generate a new domain it willl be a subdomain of your domain, f.e. projectX.yourdomain.com.
Once you done the above Github will be able to reach your Coolify instance and you will be able to 'Push on Save' your project to Coolify, j/k. The CI/CD DX from here is just perrfect.
More Advanced Features & Beyond
API for Automation
Coolify provides a powerful API that allows you to automate deployments and integrate with your existing workflows. This can be particularly useful for CI/CD pipelines or custom management scripts.
Custom Domains and SSL
Easily configure custom domains for your applications and let Coolify handle SSL certificate generation and renewal automatically.
Git & Docker Integration
Coolify supports Git-based deployments, allowing you to push your code to a remote repository and have Coolify automatically deploy it. This is perfect for CI/CD pipelines and continuous deployment.
Database Management
Coolify supports various databases out of the box, including:
- MySQL
- PostgreSQL
- MongoDB
- Redis
- & more!
You can easily create, manage, and backup your databases through the Coolify interface or API.
Monitoring & Logs
Coolify provides detailed monitoring and logging for your applications and services. You can view real-time metrics, logs, and error logs directly in the Coolify interface.
Community and Support
Coolify has a vibrant community of developers and users including myself who contribute to its ongoing development and improvement. You can find help, share your ideas, and stay updated on the latest features and updates by joining the Coolify discord community or join HeyAndras live on twitch.
💡 Conclusion
Coolify is the perfect, open-source, and customizable platform for developers who want more control over their hosting infrastructure. It allows you to create a powerful self-hosted environment with features comparable to cloud platforms like Vercel and Heroku.
By using Coolify, you can potentially save on hosting costs, have full control over your data, and customize your infrastructure to your exact needs. Whether you're a solo developer, small business, or growing startup, Coolify provides the tools you need to deploy and manage your applications with ease.
The combination of easy setup, powerful features, and flexibility makes Coolify an excellent choice for developers looking to take control of their hosting environment without sacrificing the conveniences of modern deployment platforms.
Extra: Nuxt Coolify Module
Over the last few months I've been working on a Nuxt module for Coolify, it wraps the Coolify API and provides a set of server utilities for Nuxt and Nitro. Special thanks and shoutout to Sandros94, pi0, and many more.
The module is still in the early stages of development, but it already provides a set of useful utilities. It injects our Nitro server utilities to your Nuxt project, which can be used to interact with the Coolify API from your Nitro server endpoints.
Quickstart
Use npx nuxi module add nuxt-coolify to automaticly add the module to your project or,
Install nuxt-coolify using your package manager of choice and add it manually to your modules: ['nuxt-coolify'] array within your nuxt.config.ts file.
A follow up article will cover the module and usage in more detail.
Nitro Preset for Coolify
We are working hardd on a Nitro preset for Coolify, the PR is still WIP. Stay Tuned!